VFL FFNet Model Training

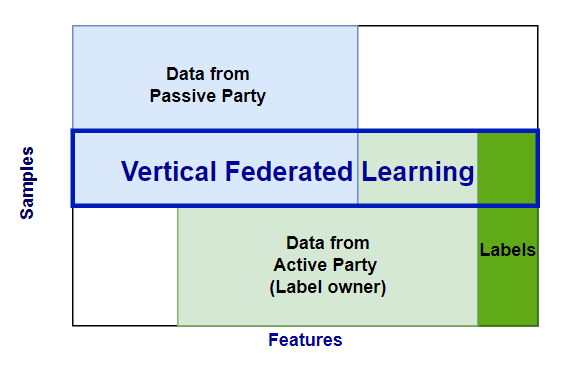
In a vertical federated learning (VFL) process, two or more parties collaboratively train a model using datasets that share a set of overlapping features. Each party has partial information about the overlapped subjects in the dataset. Therefore, before running a VFL training session, a private record linkage (PRL) session is performed to find the intersection and create alignment between datasets.

There are two types of parties participating in the training:

  • The Active Party owns the labels, and may or may not also contribute data.

  • The Passive Party contributes only data.

For example, in data sharing between a hospital (party B, the Active party) and a medical imaging centre (party A, the Passive party), only a subset of the hospital patients will exist in the imaging centre's data. The hospital can run a PRL session to determine the target subset for VFL model training.

VFL Session Overview

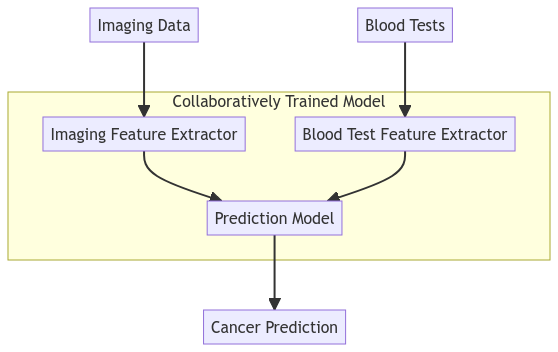
A hospital may have patient blood tests and outcome information on cancer, but imaging data is owned by an imaging centre. They want to collaboratively train a model for cancer diagnosis based on the imaging data and blood test data. The hospital (active party) would own the outcome and patient blood tests and the Imaging Centre (passive party) would own the imaging data.

A simplified model of the process is shown below.

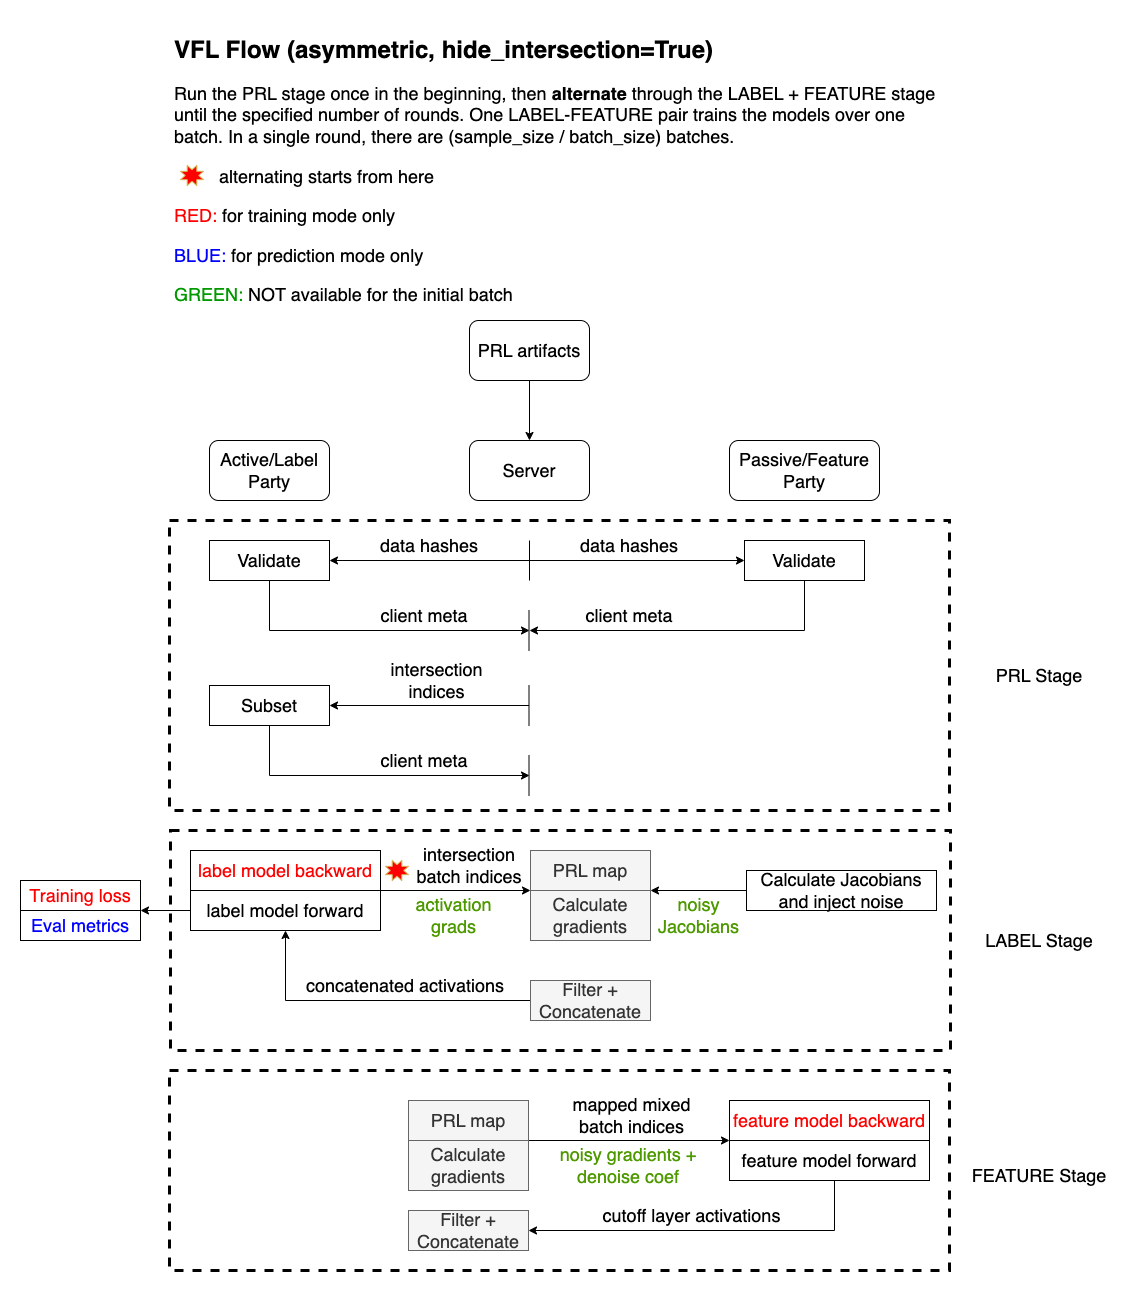
integrate.ai VFL Flow

The following diagram outlines the training flow in the integrate.ai implementation of VFL.

VFL Training Session Example

Use the integrateai_fargate_batch_client_vfl.ipynb notebook to follow along and test the examples shown below by filling in your own variables as required.

The notebook demonstrates both the PRL session and the VFL train and predict sessions.

This example uses AWS Fargate and Batch to run the session.

  1. Complete the Environment Setup.

  2. Ensure that you have the correct roles and policies for Fargate and Batch. See Using AWS Batch with integrate.ai and Running a training server on AWS Fargate for details.

  3. Run a PRL session to obtain the aligned dataset. This session information is required for the VFL training session. Note: The sample notebook demonstrates running the PRL session and VFL sessions in the same flow. However, if you have already run a successful PRL session, you could instead provide that session ID to the VFL train session directly.

  4. Create a model_config and a data_config for the VFL session.

model_config = {"strategy": {"name": "SplitNN", "params": {
        "hide_intersection": True/False             
        }},
    "model": {
        "feature_models": {
            "passive_client": {"params": {"input_size": 7, "hidden_layer_sizes": [6], "output_size": 5}},
            "active_client": {"params": {"input_size": 8, "hidden_layer_sizes": [6], "output_size": 5}},
        },
        "label_model": {"params": {"hidden_layer_sizes": [5], "output_size": 2}},
    },
    "ml_task": {
        "type": "classification",
        "params": {
            "loss_weights": None,
        },
    },
    "optimizer": {"name": "SGD", "params": {"learning_rate": 0.2, "momentum": 0.0}},
    "seed": 23,  # for reproducibility
}

Arguments:

  • strategy: Specify the name and parameters. For VFL, the strategy is SplitNN.

    • This strategy accepts an optional parameter hide_intersection. If set to True, the intersection membership information is hidden from passive parties.

  • model: Specify the feature_models and label_model.

    • feature_models refers to the part of the model that transforms the raw input features into intermediate encoded columns (usually hosted by both parties).

    • label_model refers to the part of the model that connects the intermediate encoded columns to the target variable (usually hosted by the active party).

  • ml_task: Specify the type of machine learning task, and any associated parameters. Options are classification or regression.

  • optimizer: Specify any optimizer supported by PyTorch.

  • seed: Specify a number.

data_config = {
        "passive_client": {
            "label_client": False,
            "predictors": ["x1", "x3", "x5", "x7", "x9", "x11", "x13"],
            "target": None,
        },
        "active_client": {
            "label_client": True,
            "predictors": ["x0", "x2", "x4", "x6", "x8", "x10", "x12", "x14"],
            "target": "y",
        },
    }

Create and start a training session

Create a VFL training session.

Specify the PRL session ID and ensure that the vfl_mode is set to train.

vfl_train_session = client.create_vfl_session(
    name="Testing notebook - VFL Train",
    description="I am testing VFL Train session creation through a notebook",
    prl_session_id=prl_session.id,
    vfl_mode='train',
    min_num_clients=2,
    num_rounds=5,
    package_name="iai_ffnet",
    data_config=data_config,
    model_config=model_config
).start()

vfl_train_session.id

Set up the task builder and task group

In the sample notebook, the server and client task builders are set up in the PRL session workflow, so you only have to create the VFL task group.

If you are not using the notebook, ensure that you import the required packages from the SDK, and create a server and client task builder.

Create a task in the task group the server, and for each client. The number of client tasks in the task group must match the number of clients specified in the data_config used to create the session.

The following parameters are required for each client task:

  • train_path

  • test_path

  • batch_size

  • storage_path

  • client_name

The vcpus and memory parameters are optional overrides for the job definition.

#Define where to store the models
model_storage = s3://iai-client.sample-data-e2e.integrate.ai/prl_vfl/e2e_models/

#Create the task group and add tasks
vfl_task_group_context = (
    SessionTaskGroup(vfl_train_session)
    .add_task(task_server.fls(subnet_id, security_group, storage_path=model_storage, client=client))
    .add_task(
        tb.vfl_train(
            train_path=active_train_path,
            test_path=active_test_path,
            vcpus="2",
            memory="16384",
            batch_size=1024,
            storage_path=model_storage,
            client=client,
            client_name="active_client",
        )
    )
    .add_task(
        tb.vfl_train(
            train_path=passive_train_path,
            test_path=passive_test_path,
            vcpus="2",
            memory="16384",
            batch_size=1024,
            storage_path=model_storage,
            client=client,
            client_name="passive_client",
        )
    )
    .start()
)

Monitor submitted jobs

Each task in the task group kicks off a job in AWS Batch. You can monitor the jobs through the console or the SDK.

# session available in group context after submission
print(vfl_task_group_context.session.id)

# status of tasks submitted
vfl_task_group_status = vfl_task_group_context.status()
for task_status in vfl_task_group_status:
    print(task_status)
    
# Use to monitor if a session has completed successfully or has failed
# You can modify the time to wait as per your specific task
vfl_task_group_context.wait(300)

When the session completes successfully, "True" is returned. Otherwise, an error message appears.

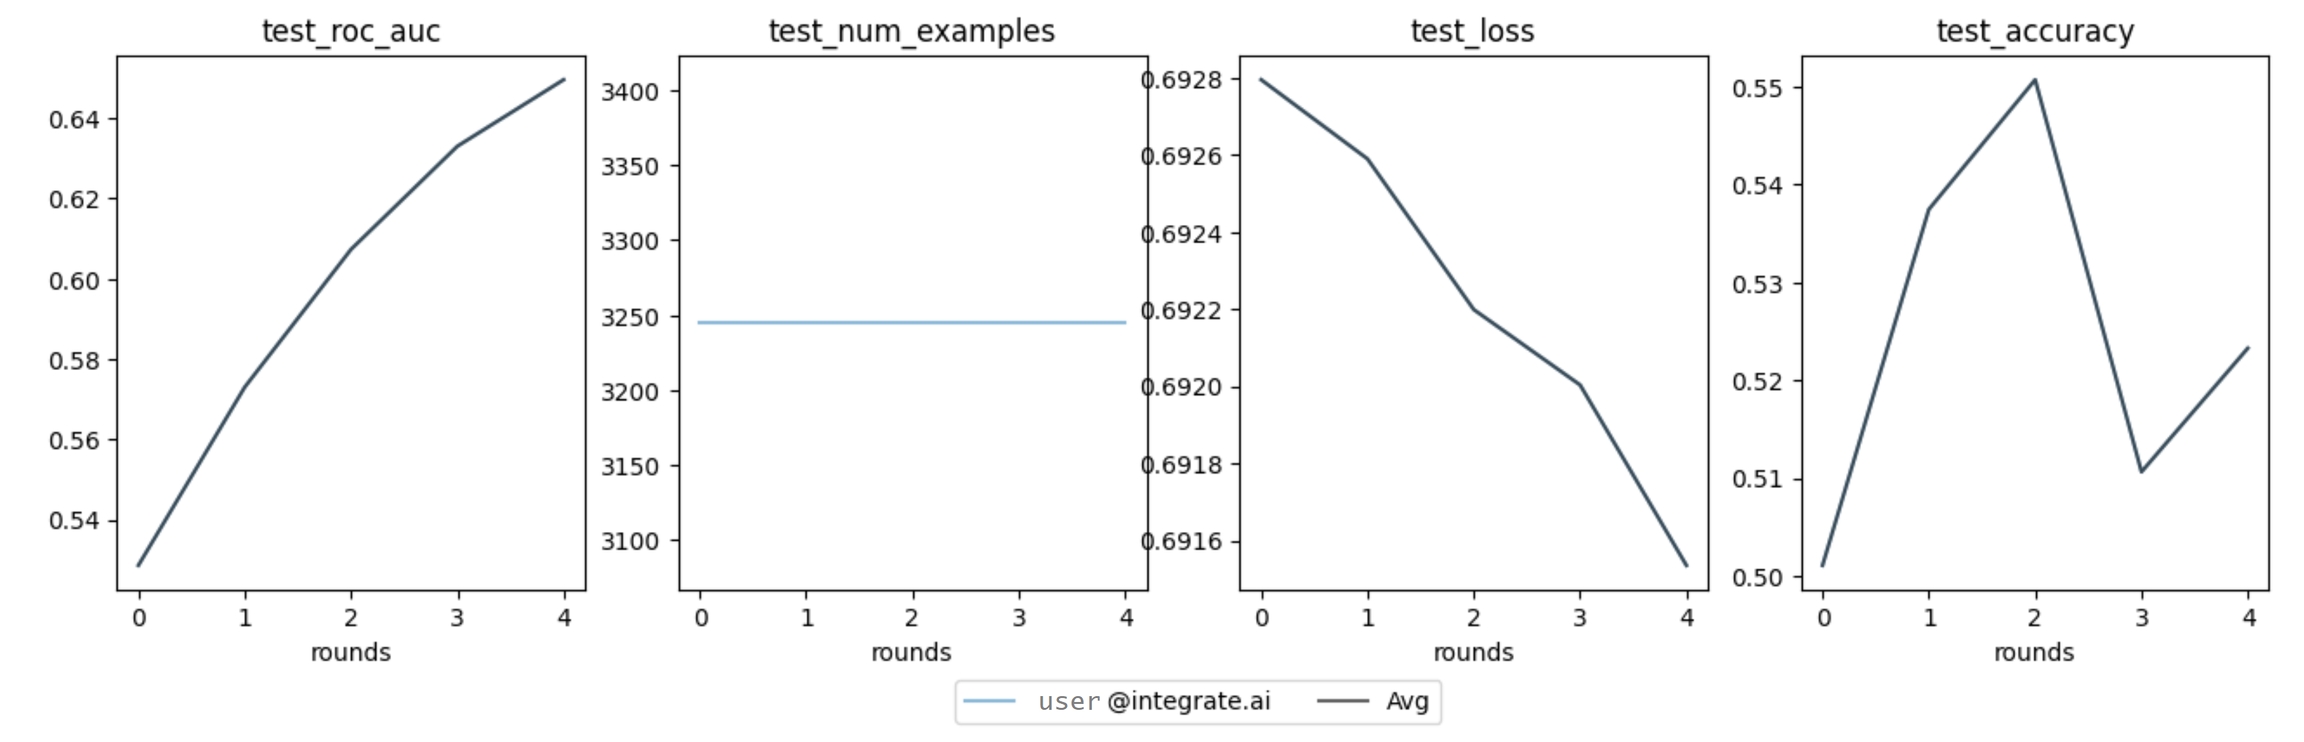
View the training metrics

Once the session completes successfully, you can view the training metrics.

vfl_train_session.metrics().as_dict()
Example of training metrics output
{'session_id': '498beb7e6a',
 'federated_metrics': [{'loss': 0.6927943530912943},
  {'loss': 0.6925891094472265},
  {'loss': 0.6921983339753467},
  {'loss': 0.6920029462394067},
  {'loss': 0.6915351291650617}],
 'client_metrics': [{'user@integrate.ai:79704ac8c1a7416aa381288cbab16e6a': {'test_roc_auc': 0.5286237121001411,
    'test_num_examples': 3245,
    'test_loss': 0.6927943530912943,
    'test_accuracy': 0.5010785824345146}},
  {'user@integrate.ai:79704ac8c1a7416aa381288cbab16e6a': {'test_num_examples': 3245,
    'test_accuracy': 0.537442218798151,
    'test_roc_auc': 0.5730010669487545,
    'test_loss': 0.6925891094472265}},
  {'user@integrate.ai:79704ac8c1a7416aa381288cbab16e6a': {'test_accuracy': 0.550693374422188,
    'test_roc_auc': 0.6073282812853845,
    'test_loss': 0.6921983339753467,
    'test_num_examples': 3245}},
  {'user@integrate.ai:79704ac8c1a7416aa381288cbab16e6a': {'test_loss': 0.6920029462394067,
    'test_roc_auc': 0.6330078151716465,
    'test_accuracy': 0.5106317411402157,
    'test_num_examples': 3245}},
  {'user@integrate.ai:79704ac8c1a7416aa381288cbab16e6a': {'test_roc_auc': 0.6495852274713467,
    'test_loss': 0.6915351291650617,
    'test_accuracy': 0.5232665639445301,
    'test_num_examples': 3245}}]}
fig = vfl_train_session.metrics().plot()

Example of plotted training metrics

VFL Prediction Session Example

Create and start a prediction session

To create a VFL prediction session, specify the PRL session ID (prl_session_id) and the VFL train session ID (training_session_id).

Set the vfl_mode to predict.

vfl_predict_session = client.create_vfl_session(
    name="Testing notebook - VFL Predict",
    description="I am testing VFL Predict session creation through a notebook",
    prl_session_id=prl_session.id,
    training_session_id=vfl_train_session.id,
    vfl_mode='predict',
    data_config=data_config
).start()

vfl_predict_session.id

Specify the full path for the storage location for your predictions, including the file name.

Create and start a task group for the session.

active_predictions_storage_path = "s3://<path to file>/active_predict.csv"
passive_predictions_storage_path = "s3://<path to file>/passive_predict.csv"

vfl_predict_task_group_context = (
    SessionTaskGroup(vfl_predict_session)
    .add_task(task_server.fls(subnet_id, security_group, storage_path=model_storage, client=client))
    .add_task(
        tb.vfl_predict(
            client_name="active_client",
            dataset_path=active_test_path,
            vcpus="2",
            memory="16384",
            batch_size=1024,
            storage_path=active_predictions_storage_path,
            client=client,
            raw_output=True,
        )
    )
    .add_task(
        tb.vfl_predict(
            client_name="passive_client",
            dataset_path=passive_test_path,
            vcpus="2",
            memory="16384",
            batch_size=1024,
            storage_path=passive_predictions_storage_path,
            client=client,
            raw_output=True,
        )
    )
    .start()
)

Monitor submitted jobs

Each task in the task group kicks off a job in AWS Batch. You can monitor the jobs through the console or the SDK.

# session available in group context after submission
print(vfl_predict_task_group_context.session.id)

# status of tasks submitted
vfl_predict_task_group_status = vfl_predict_task_group_context.status()
for task_status in vfl_predict_task_group_status:
    print(task_status)

# poll for status
vfl_predict_task_group_context.wait(300)

When the session completes successfully, "True" is returned. Otherwise, an error message appears.

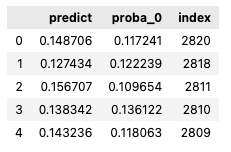
View VFL Predictions

View the predictions from the Active party and evaluate the performance.

metrics = vfl_predict_session.metrics().as_dict()
metrics

Example output:

{'session_id': '17e1a2c61d',
 'federated_metrics': [{}],
 'client_metrics': [{'user@integrate.ai:a8134864b49c45269bbb4d28187564e5': {'storage_path': 's3://<path to file>/predict.csv',
    'num_predictions': 3245}}]}
import pandas as pd

df_pred = pd.read_csv(active_predictions_storage_path)
df_pred.head()

Example output:

Last updated