Private Record Linkage (PRL) sessions
Private record linkage sessions create intersection and alignment among datasets to prepare them for vertical federated learning.
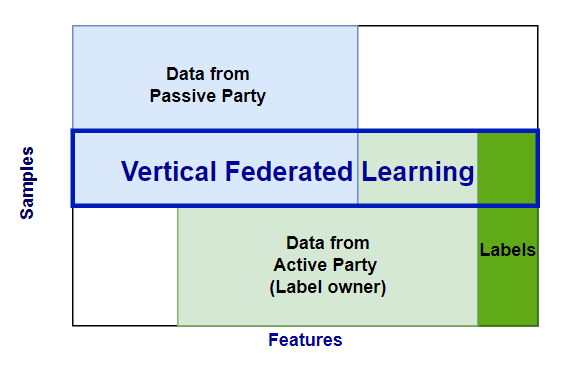
In a vertical federated learning process, two or more parties collaboratively train a model using datasets that share a set of overlapping features. These datasets generally each contain distinct data with some overlap. This overlap is used to define the intersection of the sets. Private record linkage (PRL) uses the intersection to create alignment between the sets so that a shared model can be trained.
Overlapping records are determined privately through a PRL session, which combines Private Set Intersection with Private Record Alignment.
For example, in data sharing between a hospital (party B, the Active party) and a medical imaging centre (party A, the Passive party), only a subset of the hospital patients will exist in the imaging centre's data. The hospital can run a PRL session to determine the target subset for model training.
PRL Session Overview
In PRL, two parties submit paths to their datasets so that they can be aligned to perform a machine learning task.
ID columns (
id_columns) are used to produce a hash that is sent to the server for comparison. The secret for this hash is shared between the clients and the server has no knowledge of it. This comparison is the Private Set Intersection (PSI) part of PRL.Once compared, the server orchestrates the data alignment because it knows which indices of each dataset are in common. This is the Private Record Alignment (PRA) part of PRL.
For more information about privacy when performing PRL, see PRL Privacy for VFL.
PRL Session Example
Use the integrateai_fargate_batch_client_vfl.ipynb notebook to follow along and test the examples shown below by filling in your own variables as required.
This example uses AWS Fargate and Batch to run the session using data in S3 buckets.
Complete the Environment Setup.
Ensure that you have the correct roles and policies for Fargate and Batch. See Using AWS Batch with integrate.ai and Running a training server on AWS Fargate for details.
Authenticate to the integrate.ai API client.
Create a configuration for the PRL session.
Specify a
prl_data_configthat indicates the columns to use as identifiers when linking the datasets to each other. The number of items in the config specifies the number of expected clients. In this example, there are two items and therefore two clients. In the example below, there are two clients submitting data and their datasets are linked by the "id" column in any provided datasets.
Optional Parameters
The prl_data_config accepts two optional parameters:
match_threshold- The level of accuracy to use for comparison between records. The value must be between0and1.0inclusive.similarity_function- The similarity function to use. Options arediceorhamming.
Create the session
To create the session, specify the data_config that contains the client names and columns to use as identifiers to link the datasets. For example: prl_data_config.
These client names are referenced for the compute on the PRL session and for any sessions that use the PRL session downstream.
Specify AWS parameters and credentials
Specify the paths to the datasets and the AWS Batch job information.
The train and test files can be either .csv or .parquet format.
Specify your AWS credentials if you are generating temporary ones. Otherwise, use the default profile credentials.
Set up the task builder and task group
Import the taskbuilder and taskgroup from the SDK.
Specify the server and batch information to create the task builder objects.
Create a task in the task group for each client. The number of tasks in the task group must match the number of clients specified in the data_config used to create the session.
The train_path, test_path, and client_name must be set for each task. The client_name must be the same name as specified in the data_config file.
The vcpus and memory parameters are optional overrides for the job definition.
Monitor submitted jobs
Each task in the task group kicks off a job in AWS Batch. You can monitor the jobs through the console or the SDK.
The following code returns the session ID that is included in the job name.
Next, check the status of the tasks.
Submitted tasks are in the pending state until the clients join and the session is started. Once started, the status changes to running.
View the overlap statistics
When the session is complete, you can view the overlap statistics for the datasets.
Example result:
To run a VFL training session on the linked datasets, see VFL FFNet Model Training.
To perform exploratory data analysis on the intersection, see EDA Intersect.
Last updated